|
February 14, 2008 - Oxygen Microscope software version 2.2 is released.
- Improved image managing, jpg format supported
- Using Logitech MX Revolution mouse to work with MBox
- Creation nonconvex holes is supported
- Support for new types of MBoxes Z6 Apoa and Z16 Apoa
- Fixed bug
1. Improved image managing, jpg format supported
- Support JPG format
- Rename photo sets and individual photographs
- Delete whole set
To save in JPG format:
- Click on Save current set or save all sets
- Choose .bmp or .jpg format
Note. Which format is proper for you?
MBox Images saved in JPG format have size 10 times less than images in bmp format.
Using of JPG format can save you up to 90% of disk space.
It should be noticed that JPG image compression is not lossless and slightly affects the image quality.
We believe that the level of compression used in the Oxygen software keeps enough good image quality required to work with inclusions and therefore we generally recommend to use JPG format,
especially if you store images for long time or send them through the Internet or local network.
If you don't care about the size of images and want to use lossless image format than you may prefer to use bmp.
2. Using Logitech MX Revolution mouse to work with MBox
Logitech MX Revolution mouse allows to work with MBox comfortable and increase productivity.
The mouse provide quick access to the main options: Zoom, Focus on Front Surface, Increase / Decrease Step and Speed and other.
To access all features you need to install the SetPoint software from Logitech and configure mouse as explained below.
Please use at least version 4.4 of SetPoint software. If you have older version - please download the new version
from Logitech site (http://www.logitech.com/index.cfm/428/130&cl=roeu,en)
Note. Mouse control for MBox works only in microscope camera mode and you should also move the mouse into the video area.
Use the wheel to move the focus. One rotation click moves focus according the current focus step displayed in the bottom panel.
To switch focus step with the mouse in the SetPoint software assign forward and back mouse buttons with the corresponding keystrokes:
- "." (usually on the button >) - for the forward button (increase step/speed)
- "," (usually on the button <) - for the backward button (decrease step/speed)
Search button (small silver button behind the wheel) may be assigned with Ctrl-F keys to be used for the Focus on Front Surface
The side (zoom) wheel may be used for microscope zoom control.
The optimal configuration is the following: in the SetPoint software configure the side wheel as Multiple keystroke.
It is convenient to assign keys as Ctrl-Q / Ctrl-E / Ctrl-W (or visa-versa Ctrl-W / Ctrl-E / Ctrl-Q )
- Ctrl-Q = Zoom In (next fixed zoom)
- Ctrl-W = Zoom Out (next fixed zoom)
- Ctrl-E = Max/Min Zoom. First goes to Max zoom. From the Max Zoom goes to Min Zoom value.
Fixed zoom positions are the same values as zoom buttons on the bottom panel (depends on the MBox type).
There are also few more optional commands in the software:
- Ctrl-R = Max Zoom
- Ctrl-T = Min Zoom
So anyone who need quick access for example to minimal zoom may wish to use some of these extra key settings instead of suggested scheme.
3. Creation nonconvex holes is supported
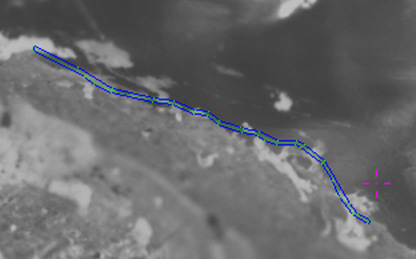
New hole algorithms allows to create ridges:

The ridges provides constructing nonconvex holes / cavities:
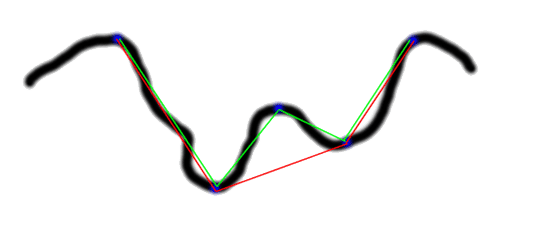
Please see difference of creation a hole surface by old and new algorithms:

Black line is a Real Hole surface, side view
Red line is the Hole convex surface constructed by old algorithm
Green line is the Hole nonconvex surface constructed by new algorithm
4. Support for new types of MBoxes Z6 Apoa and Z16 Apoa
The software identifies type of MBox to calculate correct depth of field
5. Fixed bug
In the microscope/camera mode if you have inclusion displayed in the scene and try to create a new window on rough the software crashed. This bug is fixed in the version 2.2
| 


