 |
- Open a project
- Different working
modes
- Tree panel is
the list with all solutions, rough diamond model, polished diamonds, inclusions
and etc
- Description
of scene
- Movement panel
- Working with
photo
- 3D inclusions
- Flat / 3D inclusions
- Small spherical inclusions
- Sandwich
- New algorithm
for fast automatic creation of inclusion contour
- Creating virtual
"windows" on the model
- Allocate diamonds
- Default diamond
color panel
- Appraiser and
pricelist in allocation
- Diamond parameter
panel
- Description
of stereo mode
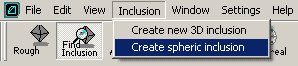
Small spherical inclusions
Small spherical inclusions inclusions can be adjusted manually with no contours.
- Make a sphere inclusion with the menu command Inclusion / Create
spheric inclusion.
- Open several photos with inclusion seen from different directions
(in several scenes simultaneously) and check "inclusions" checkbox
on photo panel.
- Activate the scene without photo, select the inclusion in the
Inclusion locator panel, choose the object movement tool in toolbar
 ("hand" button).
- Move the inclusion so the virtual projections on photo will
coincide with the images:
- To resize the sphere press and hold the "Ctrl", then drag mouse left/right.
- The default movement mode is rotation. You may wish to switch to "shift" mode by appropriate button on the toolbar. You may shift even in the rotation mode - just hold the shift during mouse drag.
- It is also possible to adjust size and position of that inclusion with the Movement panel.
- Select the viewpoint rotation tool
 ("camera" button). ("camera" button).
- Call the "Clarity " button.
|
|


