- Open a project
- Different working
modes
- Tree panel is
the list with all solutions, rough diamond model, polished diamonds, inclusions
and etc
- Description
of scene
- Movement panel
- Working with
photo
- 3D inclusions
- Flat / 3D inclusions
- Small spherical inclusions
- Sandwich
- New algorithm
for fast automatic creation of inclusion contour
- Creating virtual
"windows" on the model
- Allocate diamonds
- Default diamond
color panel
- Appraiser and
pricelist in allocation
- Diamond parameter
panel
- Description
of stereo mode
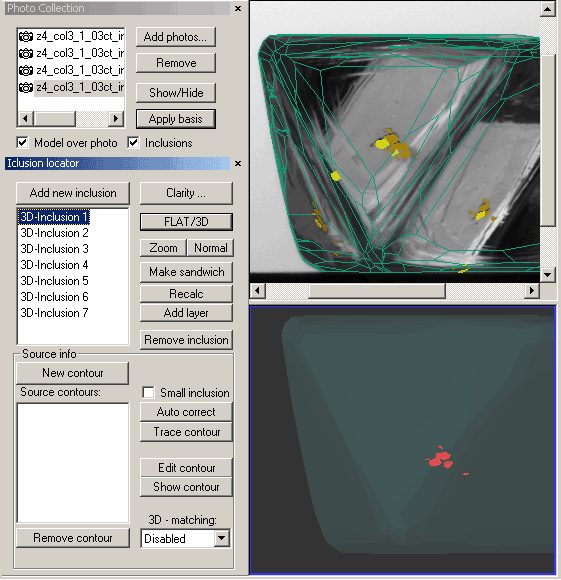
3D inclusions
In order to locate 3D inclusion use the Inclusion locator panel along with photos. You need
to use only photos from Pacor / Helium / Maya with complete position information.

The typical procedure is the following:
- Import the prepared photos with the Photo Collection
panel.
- Show photo in the scene.
- Click "New Inclusion" button.
- Find one or several images of the desired inclusion and specify contours
for these images:
- Click "New Contour". Make sure that the desired scene is Active. You
may click on the desired scene before the "New contour" command to assure
that you will work with the proper scene.
- Specify contour: do mouse clicks along the inclusion image border to
make polygon enveloping the inclusion image (you will find more detailed
description of this mode below). Double click or "Stop Edit" button will
enclose the polygon automatically. Once the contour is complete the inclusion
is automatically re-calculated. Along with the contour you will see the
yellow virtual image of inclusion as it is seen from the corresponding
facet of model.
- Specify more contours using all suitable photos.
You can create new or edit an existing contour with Inclusion
contour selection plug-in.
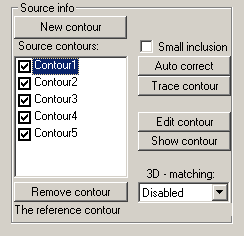
To identify a contour select it on the list and click button "Show contour".
The corresponding photo will be displayed and the contour will be highlighted
on the scene.
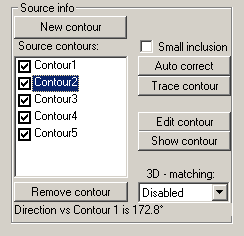
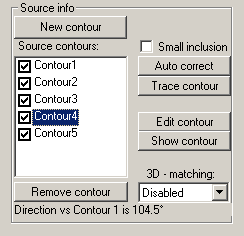
You can clarify the effective angle between projections of reference contour
and selected one. By default the reference is Contour 1.
Select a contour and the information will appear in the bottom of Inclusion
locator panel.
To set another contour as refernce do the righ click on the desired contour.
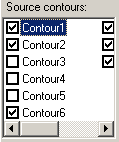
If the contour is created by mistake you can remove it with "Remove contour button". You may select the group of contours in the Inclusion locator panel using [Shift] key and remove all them with "Remove contour" button.
You may disable specific inclusion contour if you want to see the inclusion model created without consideration of that contour (like if you removed the contour). To disable or enable an inclusion contour click the corresponding checkbox in the contours list.
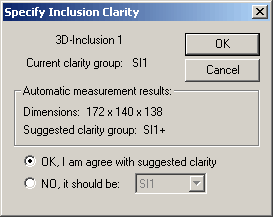
Press the button "Specify Clarity" when the inclusion is localized. The program will made approximate measurement of inclusion and suggest the clarity group. By default all newly created inclusions are SI1:
*When you save the project:
- The source contours of inclusion are saved. Please notice: to view and/or edit contours after save/load user needs to load used photographs in the program manually;
- The inclusions are saved with the sandwich structure information allowing to continue work with sandwich structure after save/load;
- The contour state (enabled or disabled) is saved as well.
|