- Open a project
- Different working
modes
- Tree panel is
the list with all solutions, rough diamond model, polished diamonds, inclusions
and etc
- Description
of scene
- Movement panel
- Working with
photo
- 3D inclusions
- Flat / 3D inclusions
- Small spherical inclusions
- Sandwich
- New algorithm
for fast automatic creation of inclusion contour
- Creating virtual
"windows" on the model
- Allocate diamonds
- Default diamond
color panel
- Appraiser and
pricelist in allocation
- Diamond parameter
panel
- Description
of stereo mode
Sandwich
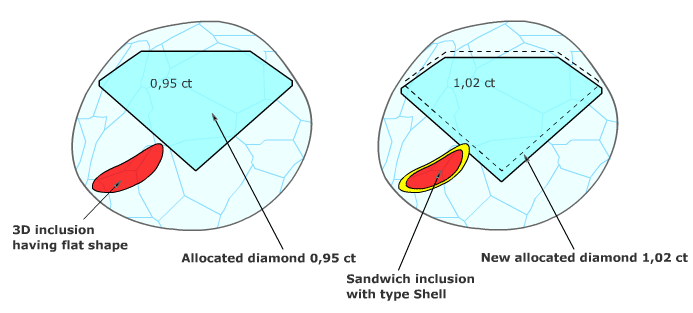
Sandwich feature allows you to find allocation options having parts of big inclusion inside polished diamonds.
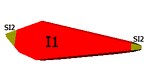
To create sandwich select the desired inclusion and click button "Make sandwich" in the Inclusion locator panel.
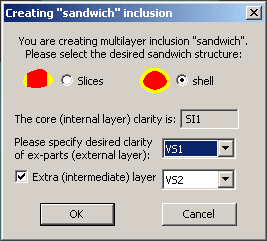
You can select two different types of sandwich: "slices" and "shell".
"Shell" sandwich feature is extended with ability to create an extra
medium layer "double sandwich". Since version 1.5.2 the sandwich feature
allows SI3/I1/I2 layers.
We recommend to use sandwiches only for cracks. Usually only cracks are allowed
to be on a surface of polished diamond. Using sandwiches allows increasing diamonds
weight.
After creation sandwich with type "Slice" you can manually control
its structure that gives you additional flexibility in diamond allocation.
The "cutting planes" of sandwich are displayed in this version as saw-edged circles.
To modify the geometry of created inclusion parts:
- Select the desired ex-part of the sandwich in the inclusion list; the corresponding sandwich part and its "circle-saw" will be highlighted.
- Select "hand" button in the toolbox to activate object movement mode.
- Rotate/move the circle by mouse drag into desired position (the movement occurs if you press and hold the "SHIFT" button while drag mouse)
- When the "circle-saw" is in the desired position press Recalc button under "make sandwich" button. This button will "recut" sandwich according to new position of planes
Select the desired ex-part and press "Remove inclusion" to remove a layer of sandwich. (This operation will not remove this part of inclusion but will join it back to the inclusion core part.
To add additional sandwich layer select the "core" inclusion and press "Add Layer" button. The new cut-plane is always created near the first cut-plane with the same cutting direction.
To return back to single inclusion (undo sandwich) select the desired sandwich ("core" part) and click "Make sandwich" again. You will be asked for confirmation.
There are two more buttons on the Inclusion locator panel that helps to work with sandwich: "Zoom" and "Normal". "Zoom" button puts the selected inclusion in the center of scenes and magnify the view to so inclusion fits the screen. It is also turns of the rough visualization. "Normal" button applies the normal scale of view and turns on rough visualization.
|


